When it comes to shell mold casting in metal manufacturing, factors such as design precision, production cost, and material suitability play an important role in determining the most efficient casting method for a product. This article explaining the shell mold casting process is intended to help you make an informed decision when selecting a casting technique for your manufacturing needs.
Shell mold casting produces high-quality metal components with excellent surface finish and dimensional accuracy while minimizing post-machining requirements. It also allows for the creation of complex and thin-walled shapes that are difficult to achieve with traditional sand casting. These benefits make the shell mold casting process particularly valuable to engineers and manufacturers aiming for both performance and production efficiency.
The goal is to understand what shell mold casting truly involves. Unlike conventional sand casting, shell molding uses a thin, hardened shell of resin-coated sand formed around a heated metal pattern. Once the shell is cured and removed, molten metal is poured into the shell cavity to produce the final casting. This method combines the precision of investment casting with the versatility and speed of sand casting. If you need shell mold casting services, please click here to view our capabilities!
To better understand how it works, let’s take a closer look at the shell mold casting process step by step.
What Are the Main Steps in the Shell Mold Casting Process?
Step 1: Design & pattern preparation
-
Design the part accounting for shrinkage, draft and gating. Patterns are normally metal (steel or cast iron) because they must withstand repeated heating. For some reactive alloys graphite may be used.
-
Machine the pattern to the final size needed (or use electroformed/3D printed pattern masters for short runs, then make a metal pattern).
Why it matters: the pattern defines the dimensional accuracy and surface finish of the casting.
Step 2: Prepare resin-coated sand (shell sand)
-
Shell molding uses a pre-coated sand: fine silica or zircon sand coated with a thermosetting resin (phenolic, furan, or modified resins).
-
Control sand grain size, coating level, and resin mix — this affects shell strength and surface finish. Use sand testing methods from AFS to maintain quality.
Step 3: Heat the pattern
-
Heat the metal pattern to the required temperature (typical range: ~175–260 °C, but the exact range depends on resin and part geometry). The heated pattern causes the resin to partially cure when sand contacts it.
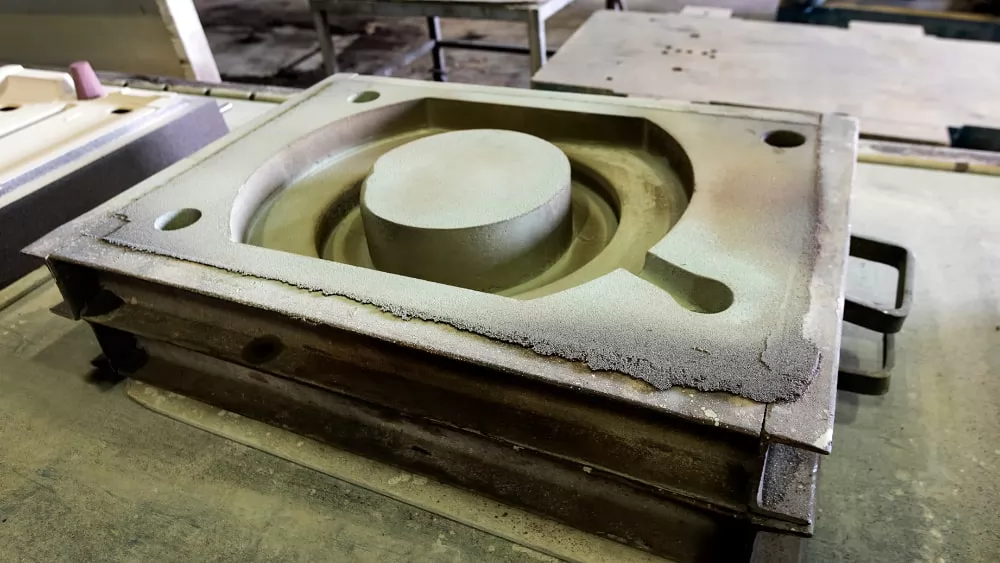
Step 4: Form the shell (two main methods)
-
Dump-box method: a box containing pre-coated sand is inverted over the heated pattern; sand contacts the pattern and a thin shell forms, then excess sand is dumped away.
-
Blow-box or coating method: sand is blown or troweled onto the pattern surface in an automated cell.
-
The initial shell thickness after the first contact is typically thin (2–6 mm); thickness is built to final spec by subsequent coating/cooking cycles or by a single longer contact depending on equipment.
Step 5: Pre-cure and oven cure
-
Partially cured shells are transferred to an oven to complete polymerization and increase strength. Oven times and temperatures depend on resin chemistry and shell thickness (typical ovens run 10–60 minutes or more). Proper curing is vital for dimensional stability and to avoid shell distortion.
Step 6: Strip shell from pattern and finish edges
-
Remove the hardened shell from the pattern. Trim matching edges or gates on the shell halves if necessary. Two matched halves (cope and drag) are created for each cavity. Check fit and alignment.
Step 7: Assemble mold, insert cores, add chills & gating
-
Join shell halves, secure with bolts or clips, place cores for internal cavities (if needed), install chills or exothermic inserts for controlled solidification, and attach gating & riser systems (often pre-attached or machined into the shell).
-
For higher accuracy, match-mark shell halves and clamp them with precision fixtures.
Step 8: Preheat / bake assembled mold (optional)
-
Some shops preheat the assembled shell to reduce thermal shock on pouring and to improve metal flow. This is optional and depends on metal and casting size.
Step 9: Pour molten metal
-
Pour the molten metal (steel, iron, aluminum, copper alloys — selection depends on alloy compatibility with shell binders). Control pouring temperature and rate to avoid gas entrapment and thermal cracking. Shell molds typically give good dimensional control for both ferrous and non-ferrous alloys.
Step 10: Cooling & shakeout
-
Allow the casting to solidify and cool to a safe handling temperature. Break the shell away (shakeout). Because shells are thin and fragile after casting they are usually destroyed to retrieve the casting.
Step 11: Cleaning, fettling and inspection
-
Remove sprues, gates and risers; grind/shotblast for surface finish; inspect dimensions, surface quality and internal soundness. Conduct nondestructive tests (e.g., dye penetrant, ultrasonic or X-ray) as required.
Step 12: Heat treatment and final machining
-
If required, heat-treat for mechanical properties and then perform final machining to tolerances. Shell castings often need less machining than generic sand castings due to better dimensional accuracy and surface finish.
Shell Mold Casting Capabilities
The shell mold casting process can be used to produce a wide range of metal components across various materials, sizes, and precision levels. Below is a summary of its general casting capabilities:
| Parameter | Typical Range / Specification | Description |
|---|---|---|
| Applicable Materials | Carbon Steel, Alloy Steel, Stainless Steel, Cast Iron, Aluminum, Bronze, Copper Alloys | Suitable for both ferrous and non-ferrous metals with excellent surface finish and accuracy. |
| Casting Weight Range | 0.5 kg – 500 kg | Best suited for small to medium-sized castings; large castings are possible with special equipment. |
| Maximum Dimensions | Up to 1000 mm × 800 mm × 600 mm | Dependent on pattern and mold-handling equipment capacity. |
| Wall Thickness | Minimum 3–6 mm | Allows relatively thin walls compared with conventional sand casting. |
| Dimensional Tolerance | CT6 – CT8 (ISO 8062) | Offers better dimensional accuracy than green sand casting and comparable to investment casting. |
| Surface Roughness | Ra 6.3 – 12.5 μm | Produces smooth surfaces requiring minimal machining. |
| Production Volume | Medium to High | Ideal for series production due to reusable metal patterns and consistent quality. |
| Common Applications | Automotive components, valve bodies, pump housings, machine parts, agricultural equipment | Used where accuracy, strength, and surface finish are important. |
Do You Need Shell Mold Casting Services?
Looking for a reliable partner for your shell mold casting projects? Qianhao is your trusted manufacturer and supplier specializing in high-quality metal castings. With years of experience in precision casting and advanced production facilities, we provide customized shell mold castings that meet strict dimensional and performance requirements.
Whether you need carbon steel, alloy steel, or stainless steel castings, Qianhao delivers consistent quality, smooth surface finishes, and reliable mechanical properties — all at competitive factory-direct prices. From automotive components to industrial machinery parts, our shell mold casting solutions ensure superior strength and precision for your applications.
Contact Qianhao today to get a free quote or discuss your next casting project. Let us help you achieve efficiency, quality, and profitability in every casting we produce.


